

 |
 |
All the rafts except the Survival Products non-TSO'd rafts, include a heaving line designed to be able to be thrown to a survivor in the water. The TSO (TSO-C70a, 5.4) requires that the "Heaving-Trailing Line" be buoyant, which makes sense.
TIP: While generally referred to as a "heaving line" or "heaving/trailing line," BFGoodrich's nomenclature, "rescue line," is more descriptive. While it can be thrown to survivors in the water, you'll be hard pressed to toss it more than 25-35 ft. with any accuracy. Its more likely use, which is not usually recognized or suggested in survival placarding or instructions, is as a safety line. By placing your arm through the quoit and sliding it up to the shoulder or tying off the line to a belt or your waist, you can safely jump back into the water to go retrieve another survivor without risk of being separated from the raft. The line also allows others in the raft to assist by pulling you back to the raft once a rescue is effected, though the thin line used can make that difficult, especially so in cold weather.
The "trailing" part of the traditional nomenclature refers to the technique of allowing it to trail behind the raft so that if someone falls out, or is tossed out of the raft, they have a chance to grab hold of the line trailing the raft before the raft moves too far away. Obviously, the line must be truly buoyant for this to be effective. How practical this might be is questionable, however some sailors who have fallen overboard have saved themselves in this manner. If the line isn't otherwise being used, it couldn't hurt, provided car is taken that it doesn't tangle in the sea anchor line.
The RFD heaving line is an orange 1/8 inch twisted polypropylene line attached to the traditional round rubber quoit. The line itself is stored inside a lightweight clear plastic sheath. On the Navigator the line and quoit is secured with a rubber band to the interior grab line to the left of the entry in the corner of the raft. On the "R" series raft is was inside the SEP. Until the SEP was retrieved (it may be in the water) the heaving line would not be available to toss to a survivor.
I found that having to take the sheath off the line was a bother and impacted the time it took to get ready to throw the line. The twisted poly is relatively stiff, not as flexible as other lines we've tested, and was not as easy to re-coil for a second throw. Poly line floats, making it easier to grasp or see in the water.
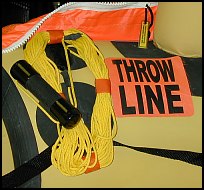 Winslow uses a yellow 3/16
inch braided polypropylene line attached to what is essentially a single handed water skiing tow rope handle. The wood handle is wrapped with non-slip black
covering and there are black end caps where the line
attaches. The end caps used to be florescent yellow/green, which made it a little easier to see. The line and handle is secured with Velcro to the raft by the entry or on the left of the entry next to the canopy arch. Small strips of Velcro keep the line neat. If the Velcro was tabbed, as are other Velcro keepers on the raft, it would make it easier and quicker to deploy the heaving line. The coiled line falls readily to hand and doesn't tangle easily. Being poly, it floats. It is mounted on the upper tube, next to the canopy arch on the left of the primary entry. A large orange placard next to the line is labeled "THROW LINE," making it hard to miss.
The Winslow handle has its pluses and minuses. It is easy to grip and will not deteriorate the way the rubber quoits inevitably do. The black handle is not the best choice of colors and could be difficult to see. Being hard, it might also hurt if it hit someone in the head when thrown. While earlier Winslow heaving lines had adequate room to slip easily over a shoulder, this time around there was much less room and it was difficult.
Air Cruisers, BFGoodrich and EAM use nylon parachute cord and a traditional round ring rubber quoit. Hoover uses 1/4 inch braided poly line and a conventional quoit. Hoover and EAM secure the it to the raft, inside a small pouch. You might not recognize it, if you didn't know to look for it. On the Hoover Type I you must retrieve it from over the side. The 50.5 ft. Hoover line fails to meet the TSO's 75 ft. requirement for Type I rafts. Air Cruisers secures theirs inside the raft with a fabric keeper wrapped around an interior grab line and secured with a metal snap.
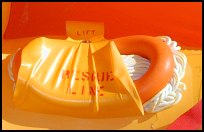 BFG retains the line on the upper raft tube to the left of the primary entry with a yellow fabric keeper. A single metal snap holds it together. The keeper wraps entirely around the line and quoit, squeezing the quoit out of shape into an oval. The keeper is stenciled in red with "RESCUE LINE" and on the tab for the metal snap is stenciled "LIFT." The quoit did not return to a round shape after it was released from the keeper, making it more difficult to use.
However, what was more disconcerting was that as we were measuring the length of the BFGoodrich heaving line on the 4-person raft, the end attached to the quoit came loose. The knot securing the line to the quoit had come undone after minimal handling.
Parachute cord is not inherently buoyant like poly. It will float for a period of time, until saturated, and then will sink and become heavy. For a single use, this isn't a significant problem. For repeated throws, it could become one. We're not convinced that parachute cord meets the TSO requirements.
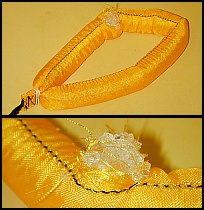
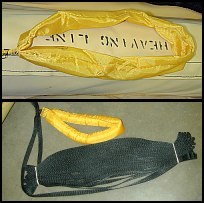 Give Survival Products credit for creative thinking in their pursuit of smaller and lighter. The quoit for their heaving line is a fabric tube filled with polymer granules that expand when immersed. It weighs virtually nothing and packs flat when dry. That the resulting floppy, sausage-like "loop" would be less capable in a real rescue would appear to be irrelevant to them, and they have somehow convinced the FAA that this is satisfactory. Our low opinion of this fabrication was not helped by the fact that one split its seam due to too much expansion of the polymer granules, spilling hundreds of sticky, jelly-like polymer globules all over the interior of the raft, rendering the heaving line even more useless and driving us crazy. Said one volunteer, "whoever designed this couldn't be concerned for the welfare of those who might have to use it."
 The Survival Products heaving line itself, which is actually flat 1/2 inch black nylon webbing, is flaked inside a fabric keeper and retained with a pair of rubber bands, one on each end. It sits above the gas cylinder on the outside of the raft with the quoit hanging out so that it would normally fall into the water so that it will absorb water and expand. "HEAVING LINE" is stenciled on the keeper in black. It would be easy to miss being as it is outside the raft. The 35 ft. line length exactly meets the TSO requirement for a Type II raft, but falls far short of that required on the Type I raft.
The traditional rubber quoit has its share of problems which don't endear it to us. It narrows down when pulled, making gripping it difficult at times. It is too small to fit over many survivor's arms, so the survivor must grip it in order to be retrieved, as must someone using it as a safety line. All too often I have seen deteriorated quoits on older inspected and certified rafts which fail under load, at which point it is virtually useless.
Except for SPI's non-TSO'd rafts, all the rafts include a raft knife. With the exception of the Navigator, all are tethered to the raft so they won't be lost. This knife is designed to be used only to cut the mooring line if necessary when it is attached to the aircraft. It is supposed to be designed to lessen the possibility of injury to the survivors or the raft. With SPI's too short line it would be redundant, no surprise they don't include one except where required by the TSO.
The raft knives come in three styles. The traditional U.S. made knife has a short, approx. 3 inch, stainless blade with a curved and rounded blunt end to prevent punctures. A foam filled aluminum or wood handle serve to keep it afloat if it drops into the water. You may still find these on older rafts and some marine rafts, but not on any of the current aviation rafts.
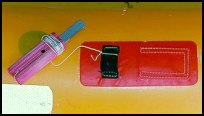 RFD uses a variation of this
concept, a small wood handled raft knife with a 1 3/8 inch straight blade and a blunt tip. The small handle and short blade make this the most difficult to use of all
of the knives.
 An alternative to the traditional
style knives with open blades is the slotted safety knife (also referred to as a
"slit" or "zip" style) with a razor blade imbedded at the end of
the slot, similar to the envelope openers which have become so
popular. A finger hole is incorporated into the pulling end.
It's pretty obvious how to use the traditional style knife. It has a handle and a blade. I have had some concerns about how intuitive the use of the zip knife would be to those unfamiliar with its operation. However, in test after test, not a single volunteer has failed to figure it out immediately upon being handed it. Either style will work, both have their advantages and drawbacks. We think the slotted knife is the safer and quicker cutting of the two.
 Air Cruisers has a unique take on this concept. Their plastic zip knife has a traditional handle with the blade at the end inside a short curved section. The opening is far larger than on the other zip knives and is actually large enough to catch a finger, which we don't like. We do like the more traditional configuration that will be easier to use with cold or gloved hands.
The TSO (TSO C70a 5.1) requires that the mooring line break away before pulling the raft under, but since most survivors wouldn't know this, a plane pulling a raft down is likely to generate panic, and quick access and use of the knife is the best means of relieving this panic.
The biggest problem in many cases is identification and location. If the idea is to be able to quickly cut yourself free, the raft knife ought to be easy to find and within easy reach of the entry point and the mooring line.
Most were not exactly easy to locate, at least for our novices, with inadequate marking on most. On the EAM and Air Cruisers 13-person the raft knife wasn't even at the entry point, but across the raft on the opposite side of the raft.
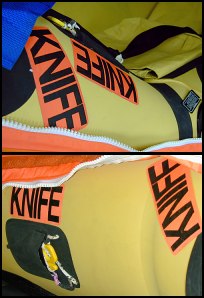 Winslow has significantly improved its raft knife storage and marking since we criticized it in the 1996 review. The large Winslow zip knife is inside a sheath mounted on top of the tube adjacent to the primary entry on the right. Two orange placards labeled "KNIFE" in black text are affixed next to it. One is oriented to the interior of the raft, the other is angled so as to be easily read by a survivor boarding the raft. We thought this was an excellent presentation. Our only complaint was that on smaller rafts the placard facing the boarding survivor is often partially covered by the lower edge of the canopy.
The knife slips into its black fabric sheath until it is held by friction with the parachute cord tether coiled around it. It readily deploys when you pull the knife out for use, but having to unwrap the parachute cord from the knife slows things down. Removing the knife from the sheath wasn't always easy, however, it was occasionally jammed in pretty tight. Some sort of pull tab on the knife or other means to readily grab and unsheathe it would be an improvement.
On the RFD Navigator the raft knife it is stored in the SEP. Since the raft is unlikely to be tethered to the aircraft because of the short tether with no clip, that is probably OK. However, in that case I can think of better knives to put in the SEP.
 On the RFD "R" series raft the knife
is adjacent to the mooring lines and attached with a nylon twine tether to its sheath. The
pouch is orange fabric with a fabric sheath for the blade and a
black elastic strap to hold the handle. The tether is wrapped
around the handle. I don't like to see tethers wrapped around the
raft knife handle since they often tangle or snag when the user is
trying to unravel it to use the knife, slowing deployment of the
knife. The straight blade of this knife does not seem to meet the
TSO requirement (TSO C70a 5.8) "A hook type knife .
. ." While the blunt tip may serve to reduce the likelihood of damaging the
raft, I'm not convinced that the straight edge blade could not
possibly injure a survivor, though admittedly it wouldn't be easy to do.
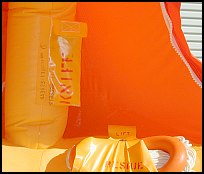 BFG mounts their zip knife on the inside of the
canopy arch to the right of the primary the entry. It was retained in a yellow
fabric sheath with the tether wrapped around it. The yellow
sheath was difficult to see against the identically colored raft fabric. It was stenciled in red with "KNIFE," but that didn't help a lot for conspicuity purposes. A Velcro'd flap retains the knife. On the 4-person raft a loop of the tether was hanging out of the sheath and it was pretty easy to use that to pull the knife out. On the 13-person there was no such loop and it was not very easy to pull the knife from the sheath. BFGoodrich uses a knife made by Hoover. The finger hole retained the little nibs from removal of the plug that is molded in originally. These nibs are sharp and painful when the knife is used. Hoover trims these nibs so they don't become a bother, how difficult can that be?
Survival Products has their zip knife in a dark red sheath attached to the mooring line itself. There is no placard or labeling on the sheath. Inside the raft the "MOORING LINE KNIFE" is listed in a stencil on the tube along with other equipment that is overboard. The knife is sewn onto the mooring line through the finger hole and there is just enough slack to pull it from its sheath. Given the too short length of the mooring line, perhaps it isn't much of an issue, but the entire arrangement is very poorly done in our opinion.
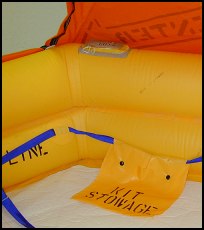 The Air Cruisers raft knife and tether is retained inside a yellow sheath that is attached to a silver piece of fabric with is then attached to the upper buoyancy tube. The contrast between the yellow and silver helps to make it more noticeable. A Velcro'd flap retains the knife, upon which is stenciled "KNIFE" in black, with the word doubled up so it is readable from either side. How useful that is may be debatable. On the 4-person raft the sheath is on top of the tube to the left of the entry, tucked up under the canopy and is difficult to see and easily missed.
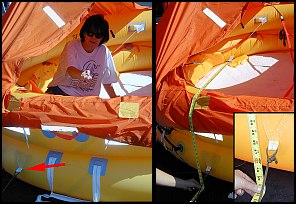 The raft knife on the 13-person Air Cruisers raft is located opposite the primary entry, on the side of the tube, and is therefore more noticeable, as long as someone doesn't cover it up sitting there. Since the normal reaction upon boarding a raft is to move as far from the entry as possible, odds are good it would immediately be covered up. However, that's the least of the problems. We were flabbergasted to discover that the tether on the knife is four feet too short to even reach the mooring line. This is unacceptable by any measure.
 As noted, I prefer the zip
knives. However, they could be improved. The single finger hole is too small to use with gloves on. It should be enlarged. The alternative is the Air Cruisers concept with a conventional handle, which we like a great deal, but prefer the blade opening be smaller. Provided there are no sharp edges or pointed corners to the knife (other than the protected blade, of course), instead of a sheath which covers the knife, Velcro glues directly to one side of the knife might well provide adequate security and serve to make it more readily obvious what it is and how it is used and therefor quicker to deploy.
| Aviation Life Raft Review (click to continue to next page) |
|
| SELECT AND USE OUTDOORS AND SURVIVAL EQUIPMENT, SUPPLIES AND TECHNIQUES AT YOUR OWN RISK. Please review the full WARNING & DISCLAIMER about information on this site. |
Publisher and Editor: Doug Ritter
|
© 1994, 1995, 1996, 2000 Douglas S. Ritter - All rights
reserved. Check our Copyright Information page for additional information. |